On the outside PTGui 12 may look much like the previous version. But under the hood it features a rewritten stitching engine and a brand new blender!
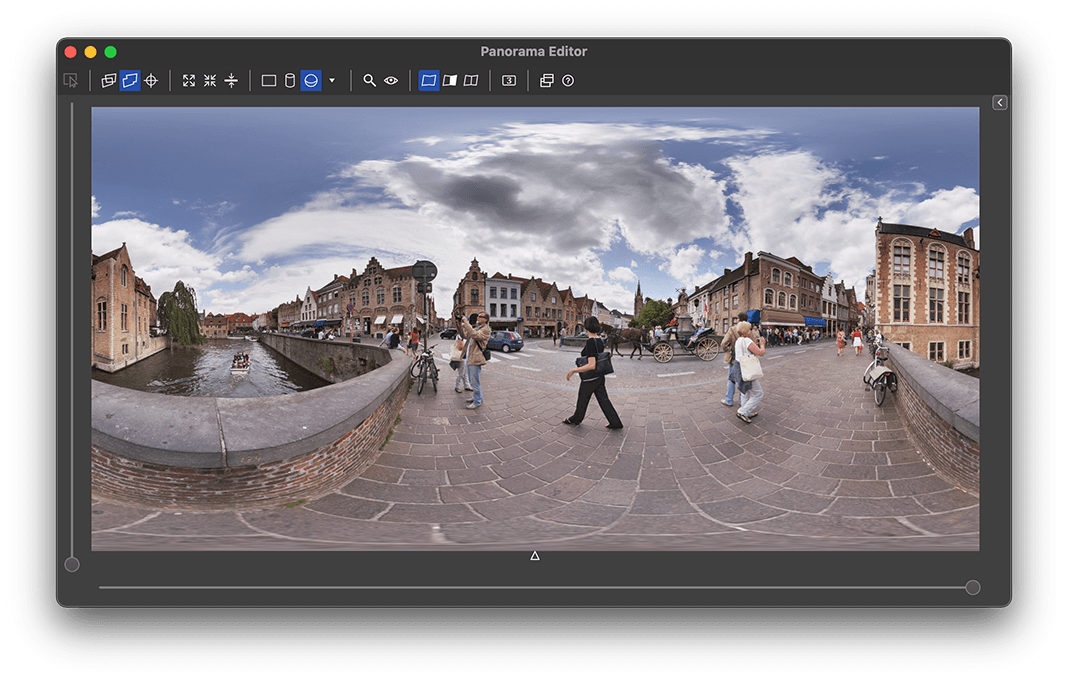
PTGui Pro 12 will analyze the regions where images overlap, and place the seams in those areas where there is the least difference between the overlapping images. It will attempt to automatically route the seams around moving objects. Also, stitching errors from parallax will be hidden as much as possible.
The Panorama Editor and Detail Viewer show a live preview of the seams. Seam placement happens automatically and on the fly, but you can still fully control where the seams should go. As in PTGui 11 the seams can be manipulated using masks: a red mask will exclude an object and move the seam away from that area, while a green mask forces an area to be included in the blended panorama. Masking doesn't have to be done precisely at all: usually a green or red dot somewhere on an object is sufficient. The seam finding algorithm will recognize the object's contours and re-route the seam in an optimum path around it.
For PTGui 12 a new blending engine has been built which requires no overlap at all. Brightness differences are distributed across the entire image, such that any differences are minimized where the images meet at the seams. Only the area enclosed by the seams is used, with no risk of ghosting from hidden objects. Combined with optimum seam placement this can create absolutely seamless panoramas even in difficult situations with moving objects. Even images with significant exposure differences are blended very well.
The following animation shows the differences between unblended, Multiband blending and the new Zero Overlap blending:

PTGui Pro 12 now also offers the reversed workflow as an option: first, all bracketed sets are merged to HDR. Then the HDR images are blended into a panorama. Because each set of bracketed images will be separately merged to HDR, bracketing in automatic exposure mode is now possible. Better yet, the number or sequence of bracketed images doesn't even have to be constant anymore. Just tell PTGui which images are bracketed sets by linking them. It's even possible to generate HDR panoramas from single, non-bracketed images taken in automatic exposure mode.
In fact, PTGui Pro 12 no longer distinguishes between HDR and non-HDR panoramas, every panorama is HDR! The stitching pipeline uses floating point data internally and any panorama, bracketed or not, can be rendered to HDR formats such as OpenEXR.
The purpose of linking images has changed: in PTGui 11, linked images would get the same yaw, pitch and roll angles but linking did not otherwise affect HDR processing. In PTGui 12, linking the images will tell PTGui that they belong to the same bracketed set but they don't necessarily have the exact same yaw, pitch and roll. In the 'merge to HDR, then blend' workflow these linked images will be combined to a single HDR source image. In the 'create blend planes' workflow, linking is also necessary because it tells PTGui to place the seam identically for these images. This is important because differently placed seams would cause artifacts when merging the blend planes to HDR.
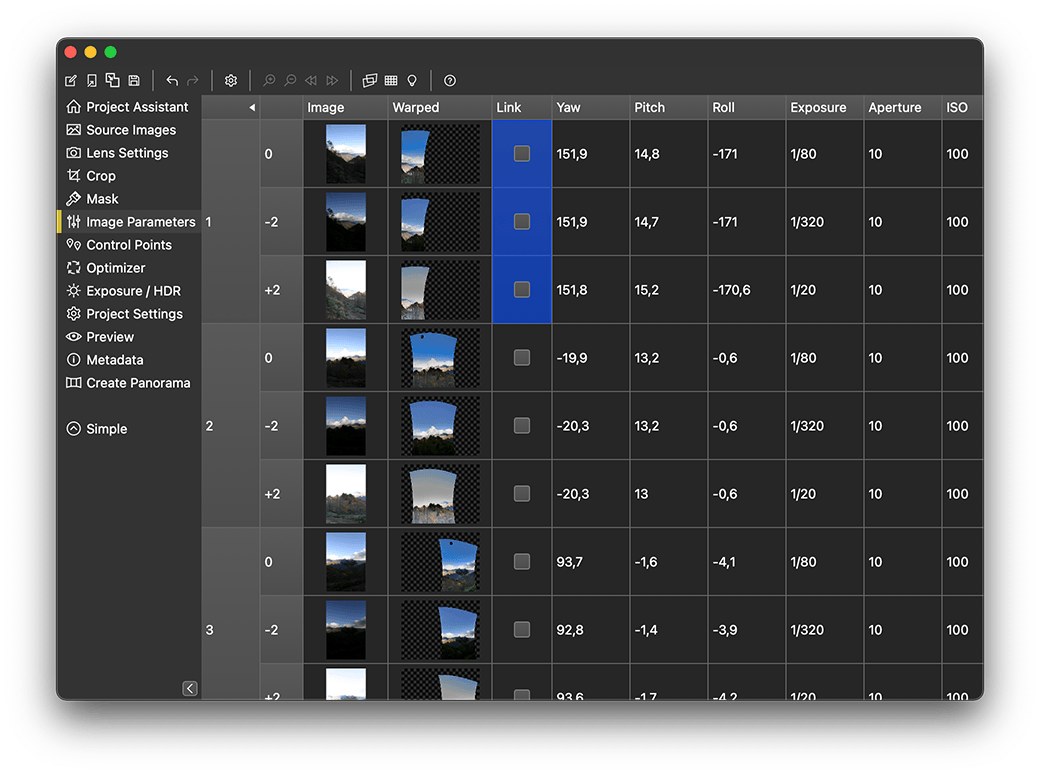
Because linking the images in PTGui 12 no longer automatically gives them the same yaw, pitch and roll angles, a separate 'Link' checkbox has been added to the Image Parameters tab. If unchecked, the bracketed images will have different yaw, pitch and roll angles:
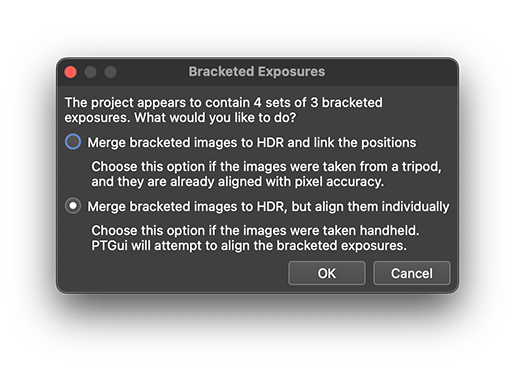
This may seem complicated, but in practise the workflow hasn't changed. If the images were shot in a repeating bracketing sequence, PTGui detects this and will offer to set up HDR processing automatically:
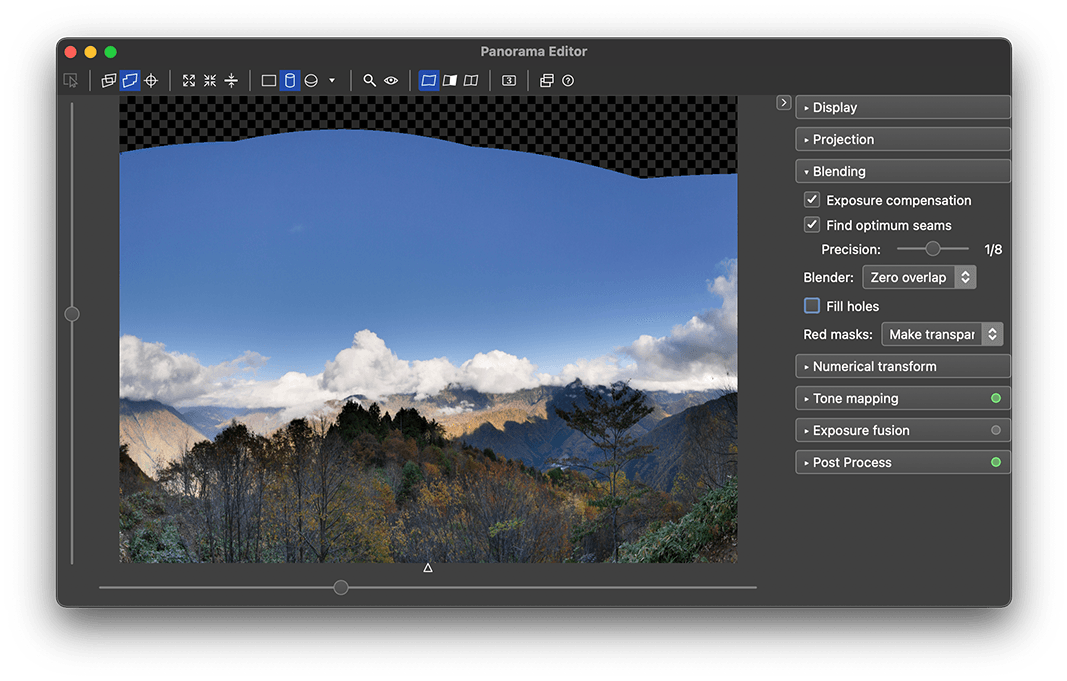
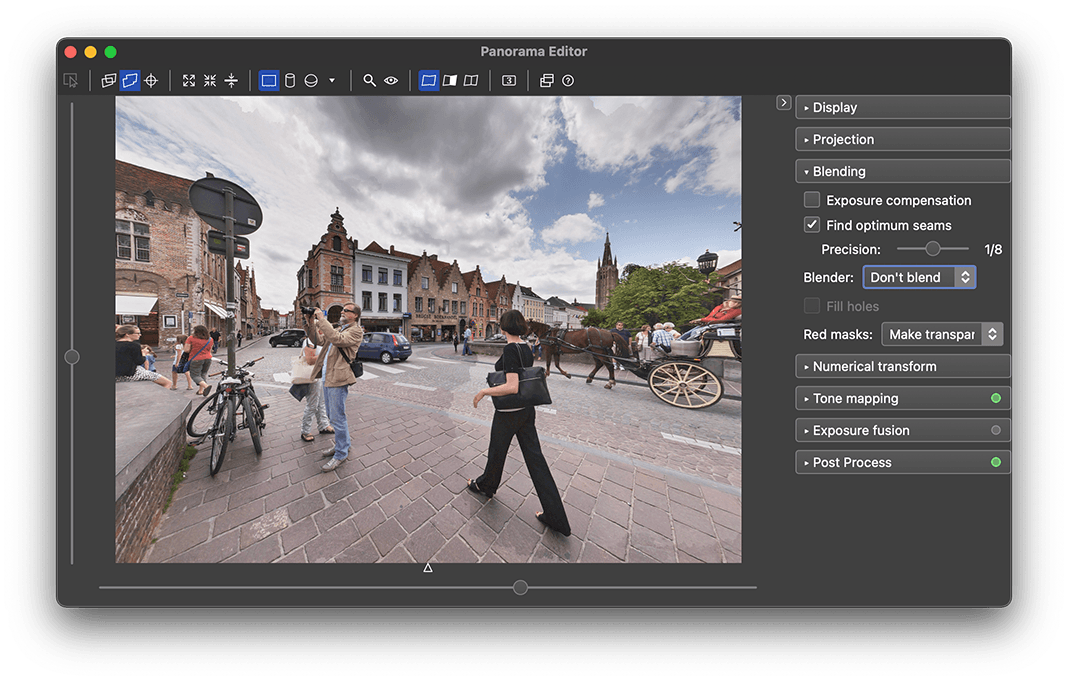
A handy feature in PTGui Pro 12 is the new 'Fill Holes' function. If enabled, all transparent areas in the panorama will be filled with a smooth color gradient matching the surrounding areas. While not not a true replacement for patching in an external image editor, it works well for example for filling up the blue sky in a drone panorama. Or it can be used as a quick way to cover the nadir of a spherical panorama.
In combination with masking it can be used as a tool to hide or blur objects: simply paint the unwanted contents with a red mask; PTGui will fill the resulting gaps. Fill Holes can be enabled in the new Blending sidebar in the Panorama Editor.
All licenses purchased on or after 1st of August 2018 are valid for PTGui 12. If you purchased before this date, you may upgrade your license here. As always, one year of free updates is included with your purchase. A free trial version is available; you can use it next to your current version by installing to a different folder.
If you have any questions about PTGui 12 please post to the PTGui Support Forum. We'll be happy to help!
Optimum seam placement (Pro version only)

PTGui Pro 12 will analyze the regions where images overlap, and place the seams in those areas where there is the least difference between the overlapping images. It will attempt to automatically route the seams around moving objects. Also, stitching errors from parallax will be hidden as much as possible.
The Panorama Editor and Detail Viewer show a live preview of the seams. Seam placement happens automatically and on the fly, but you can still fully control where the seams should go. As in PTGui 11 the seams can be manipulated using masks: a red mask will exclude an object and move the seam away from that area, while a green mask forces an area to be included in the blended panorama. Masking doesn't have to be done precisely at all: usually a green or red dot somewhere on an object is sufficient. The seam finding algorithm will recognize the object's contours and re-route the seam in an optimum path around it.
Zero overlap blending
Most existing panoramic blenders (including PTGui 11, Enblend, SmartBlend, AutoPano) use a multi-band pyramid blending algorithm. These blending algorithms do their work in the overlap region of the images and therefore need a certain amount of overlap. In the overlap region a gradual transition is made from the average brightness of one image to the next. Generally these algorithms cannot distinguish between brightness differences caused by exposure variation and brightness differences caused by moving objects; any moving objects in the overlap region remain visible as faint ghosts or halos. This happens even if the object is nearby the seam, but not actually cut through by it. Also, only the overlap region is available for equalizing brightness differences. If the overlap is narrow and the brightness difference large, the steep change in brightness will remain noticeable.For PTGui 12 a new blending engine has been built which requires no overlap at all. Brightness differences are distributed across the entire image, such that any differences are minimized where the images meet at the seams. Only the area enclosed by the seams is used, with no risk of ghosting from hidden objects. Combined with optimum seam placement this can create absolutely seamless panoramas even in difficult situations with moving objects. Even images with significant exposure differences are blended very well.
The following animation shows the differences between unblended, Multiband blending and the new Zero Overlap blending:

Improved HDR support (Pro version only)
HDR in PTGui 11 is based around 'blend planes': at each EV a complete panorama is stitched and blended. Finally the blend planes are merged to an HDR panorama or combined using Exposure Fusion. Blend planes required a consistent exposure for each blend plane and therefore the panorama had to be taken in manual exposure mode.
PTGui Pro 12 now also offers the reversed workflow as an option: first, all bracketed sets are merged to HDR. Then the HDR images are blended into a panorama. Because each set of bracketed images will be separately merged to HDR, bracketing in automatic exposure mode is now possible. Better yet, the number or sequence of bracketed images doesn't even have to be constant anymore. Just tell PTGui which images are bracketed sets by linking them. It's even possible to generate HDR panoramas from single, non-bracketed images taken in automatic exposure mode.
In fact, PTGui Pro 12 no longer distinguishes between HDR and non-HDR panoramas, every panorama is HDR! The stitching pipeline uses floating point data internally and any panorama, bracketed or not, can be rendered to HDR formats such as OpenEXR.
The purpose of linking images has changed: in PTGui 11, linked images would get the same yaw, pitch and roll angles but linking did not otherwise affect HDR processing. In PTGui 12, linking the images will tell PTGui that they belong to the same bracketed set but they don't necessarily have the exact same yaw, pitch and roll. In the 'merge to HDR, then blend' workflow these linked images will be combined to a single HDR source image. In the 'create blend planes' workflow, linking is also necessary because it tells PTGui to place the seam identically for these images. This is important because differently placed seams would cause artifacts when merging the blend planes to HDR.
Because linking the images in PTGui 12 no longer automatically gives them the same yaw, pitch and roll angles, a separate 'Link' checkbox has been added to the Image Parameters tab. If unchecked, the bracketed images will have different yaw, pitch and roll angles:

This may seem complicated, but in practise the workflow hasn't changed. If the images were shot in a repeating bracketing sequence, PTGui detects this and will offer to set up HDR processing automatically:

Fill Holes (Pro version only)

A handy feature in PTGui Pro 12 is the new 'Fill Holes' function. If enabled, all transparent areas in the panorama will be filled with a smooth color gradient matching the surrounding areas. While not not a true replacement for patching in an external image editor, it works well for example for filling up the blue sky in a drone panorama. Or it can be used as a quick way to cover the nadir of a spherical panorama.
In combination with masking it can be used as a tool to hide or blur objects: simply paint the unwanted contents with a red mask; PTGui will fill the resulting gaps. Fill Holes can be enabled in the new Blending sidebar in the Panorama Editor.
Color Management
Long overdue, PTGui 12 is finally fully color managed! PTGui 12 recognizes color profiles in source images and will display them properly on screen. PTGui can transform between color spaces; the desired target color profile can be selected in the Create Panorama tab. Panoramas from RAW source images are no longer limited to sRGB as in PTGui 11.Linux support
At last, PTGui has been ported to Linux! The Linux version is fully functional, including support for OpenCL GPU acceleration. A PTGui license is platform independent, so a single license now allows you to run PTGui on all major desktop operating systems.Post Processing side bar
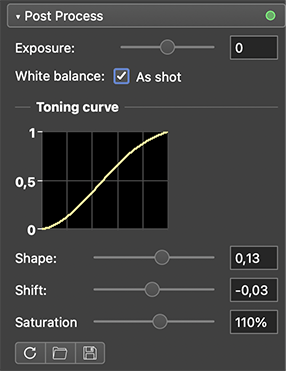
A new Post Processing side bar was added to the Panorama Editor, for adjusting the toning curve, white balance and saturation. This is useful in particular when working with RAW source images:
Other changes
- PTGui Pro: The behavior of red masks is configurable. Previously red masked areas would always be made transparent in the warped image layers. This would result in a hole in the blended panorama if no other image overlaps. By setting 'Red Masks: Use only to adjust seams', the mask will not result in transparency, it is only used to guide seam placement.
- Users of the standard version of PTGui 12 gain access to a number of features previously only available in PTGui Pro: vignetting / exposure correction, Exposure Compensation (for panoramas taken in automatic exposure mode) and most of the Project Settings tab.
- The grid (crosshair) in the Panorama Editor can be hidden entirely, by clicking the little triangle below the panorama in the Panorama Editor.
- Switching between Exposure Fusion and Tone Mapping (True HDR) can now be done from the panorama editor's side bar (as well as in the Exposure / HDR tab). Exposure Fusion is now supported for non-bracketed panoramas as well.
- Improved metadata support: most XMP metadata from the source images is now copied to the panorama. Metadata is now written to Photoshop .psd and .psb files as well.
And much more..
For all details see the version history. You can download PTGui 12 here, or use Help - Check for Updates to update your currently installed PTGui version.All licenses purchased on or after 1st of August 2018 are valid for PTGui 12. If you purchased before this date, you may upgrade your license here. As always, one year of free updates is included with your purchase. A free trial version is available; you can use it next to your current version by installing to a different folder.
If you have any questions about PTGui 12 please post to the PTGui Support Forum. We'll be happy to help!