After more than three years of preparation we're proud to release PTGui 11!
Why did it take so long? Over the years we've gathered many ideas for improvements and new functionalities in PTGui and many of those features have been implemented over time. But we've found that more and more ideas remained on the shelf because they would require major changes to the inner workings of PTGui.
PTGui was originally released in 2001. Over the past 17 years software development technologies have evolved significantly. Some of the original design decisions were hampering the implementation of certain features. And of course user interface design has changed a lot over the years and PTGui was starting to look dated. So we've taken a step back and rebuilt much of PTGui's foundation, and PTGui 11 is the result! So what's new?
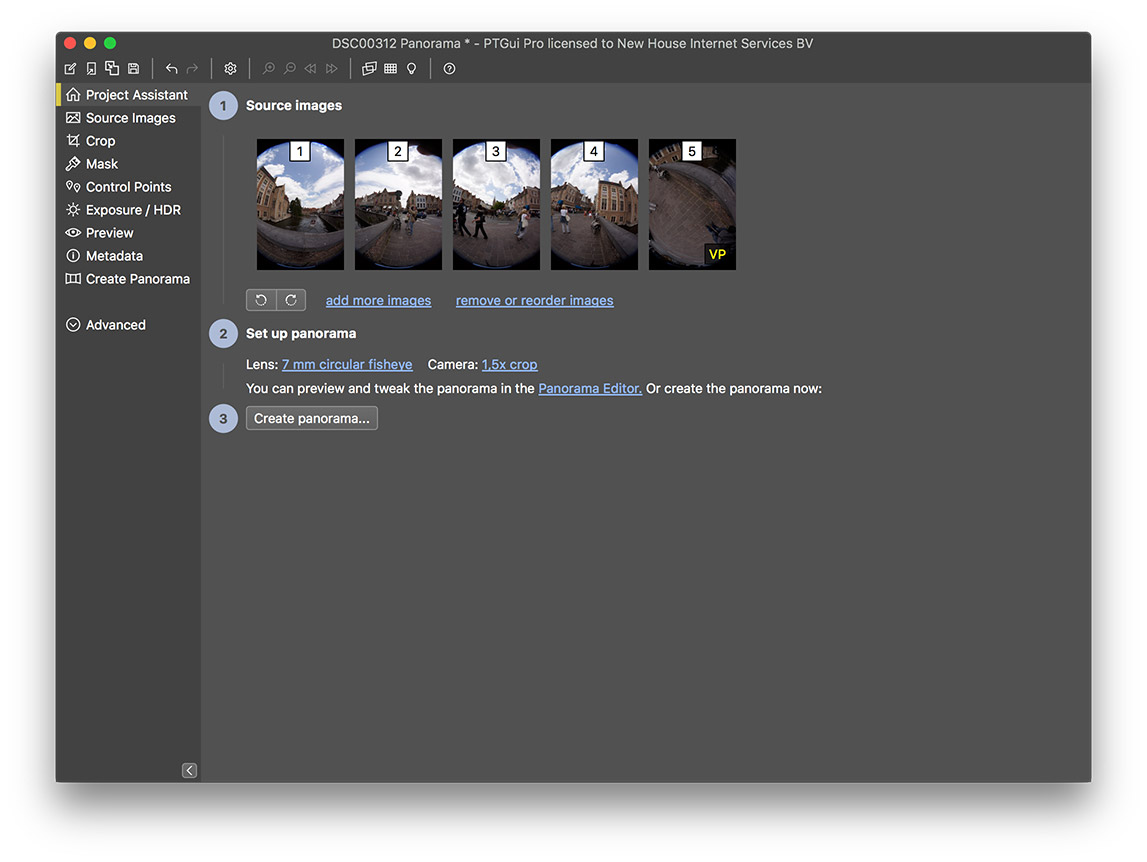
PTGui 11 uses collapsible panels to make the tools available where you need them but without occupying precious screen real estate. The familiar row of tabs at the top of the window have been moved to a vertical panel at the left side, to be more consistent with current user interface concepts. The side bar can be collapsed to make more space available. The numbered tabs for selecting images (e.g. in the Control Points tab) have been replaced with image thumbnails, so you can see which image is which. And PTGui 11 is fully compatible with Retina screens and supports per-monitor high DPI under Windows.

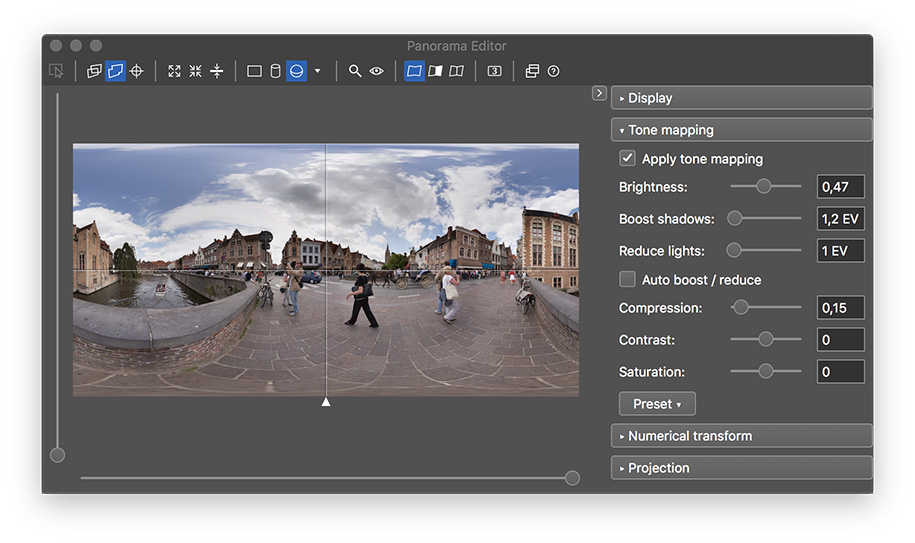
Speaking of lenses, PTGui changes the parametrization of lens data: instead of characterizing a (rectilinear or fisheye) lens by its horizontal field of view, PTGui 11 stores the focal length. Lens shift (i.e. the offset of a lens' optical axis) is now stored as relative offsets on the short and long image dimensions, instead of absolute x/y pixel offsets. These two changes finally make it possible to mix portrait and landscape images in the same project.
For fisheye lenses PTGui 11 introduces a new fisheye projection parameter allowing it to perfectly model all practical fisheye projections (equidistant, stereographic, orthographic and equisolid). Presets for many known fisheye lenses are included, and selected automatically when a known fisheye lens is recognized in the EXIF data. By knowing the exact fisheye projection PTGui is able to find more control points, particularly in the edges of fisheye images. Furthermore it allows PTGui to set the cropping circle (for circular fisheye lenses) more accurately.
Very useful for stitching large panoramas is the option to generate control points only for overlapping images (Pro version only). This gives a significant speed improvement when aligning thousands of images (what would take days may now finish in an hour) and further reduces the chances of faulty control points. The images should be roughly positioned beforehand, using Align to Grid, by applying a template or by loading a PapyWizard XML file.
You can upgrade from an earlier version to PTGui 11 by paying an upgrade fee, or free of charge, depending on the original purchase date. A free trial version is available; you can use it next to your current version by installing to a different folder.
If you have any questions about PTGui 11 please post to the PTGui Support Forum. We'll be happy to help!
Why did it take so long? Over the years we've gathered many ideas for improvements and new functionalities in PTGui and many of those features have been implemented over time. But we've found that more and more ideas remained on the shelf because they would require major changes to the inner workings of PTGui.
PTGui was originally released in 2001. Over the past 17 years software development technologies have evolved significantly. Some of the original design decisions were hampering the implementation of certain features. And of course user interface design has changed a lot over the years and PTGui was starting to look dated. So we've taken a step back and rebuilt much of PTGui's foundation, and PTGui 11 is the result! So what's new?
New user interface
The most obvious change is a new modern, dark themed user interface:
PTGui 11 uses collapsible panels to make the tools available where you need them but without occupying precious screen real estate. The familiar row of tabs at the top of the window have been moved to a vertical panel at the left side, to be more consistent with current user interface concepts. The side bar can be collapsed to make more space available. The numbered tabs for selecting images (e.g. in the Control Points tab) have been replaced with image thumbnails, so you can see which image is which. And PTGui 11 is fully compatible with Retina screens and supports per-monitor high DPI under Windows.

Improved HDR support
In the Pro version handling of HDR panoramas has been much improved. Throughout the entire user interface bracketed sets of images are now treated as a single image. Each bracketed set is represented by a single exposure fused thumbnail image. So for example, when using 3 step bracketing you now only have to deal with 5 merged images instead of 15 individual images. The control points editor simultaneously shows all control points for the combined images in two bracketed sets. It is still possible to view individual images (by clicking on the thumbnails in the Control Points tab, or using the keyboard shortcut Ctrl+Alt+Up/Down on Windows, or Cmd+Alt+Up/Down on Mac). The Image Parameters screen can be collapsed to show bracketed groups or it can be expanded to edit the parameters of individual images in each set.
Panorama Editor and Detail Viewer
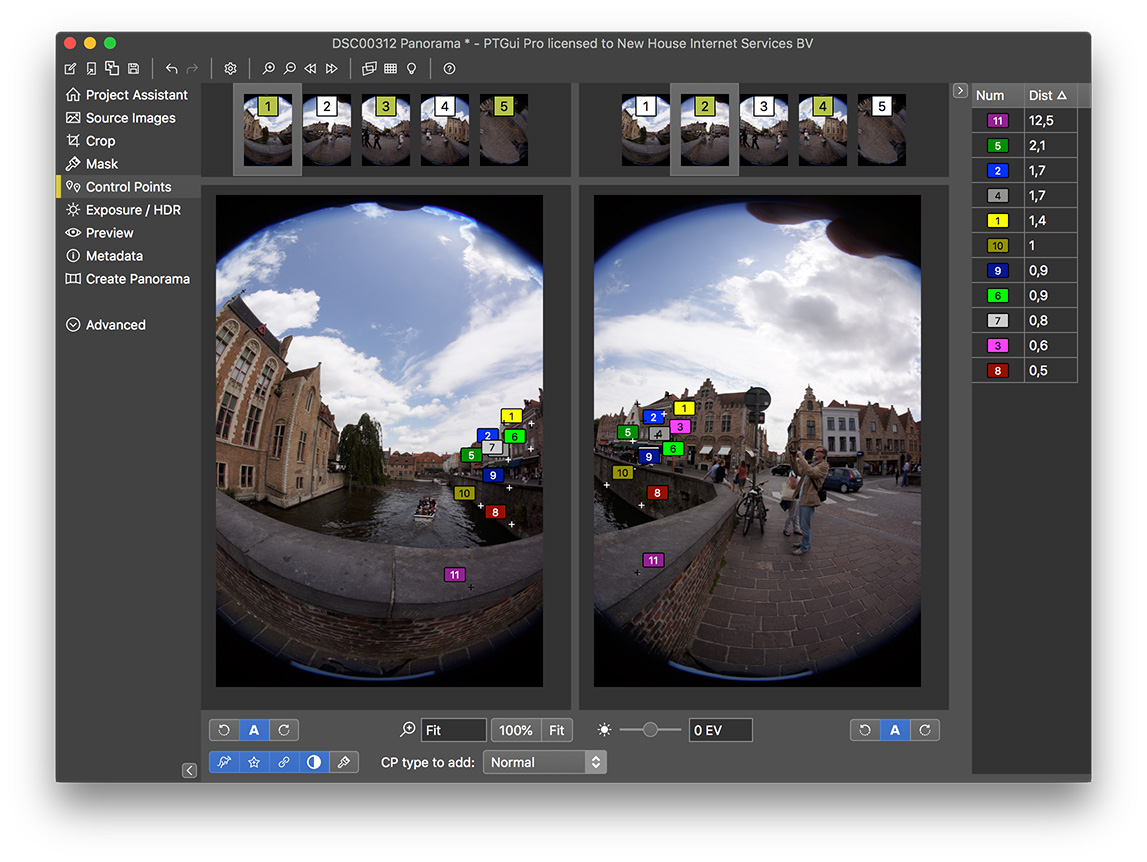
The Panorama Editor and Detail Viewer now use the same stitching engine as used for the final render. This gives a true WYSIWYG preview of the panorama, in real time, properly blended and anti aliased at screen resolution. No more blurry previews in the Panorama Editor or shimmering in the Detail Viewer! The panorama editor in PTGui Pro 10 had limited functionality when working with HDR panoramas. Not so any more: you now get a live tone mapped or exposure fused preview. A collapsible side bar has been added to the panorama editor. Tone mapping and exposure fusion settings can be edited right in the panorama editor's side bar. Numerical Transform and the Panorama Settings tab have been moved to here as well. The Panorama Editor and Detail Viewer now benefit from OpenCL GPU acceleration.
Automatic lens detection
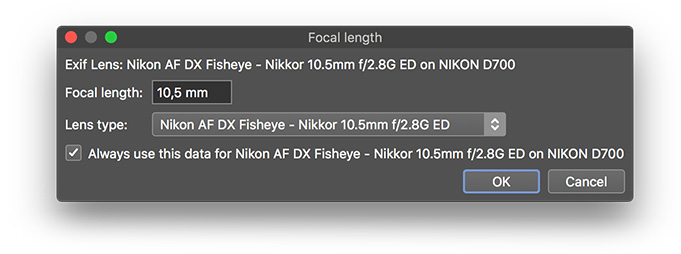
EXIF metadata parsing has been improved as well. PTGui can now read most manufacturer dependent 'maker notes'; this allows it to not only determine the focal length but in many cases also the actual lens brand and model. The lens parameters will be initialized correctly, whereas PTGui 10 would sometimes mistake a wide angle rectilinear lens for a fisheye or vice versa.
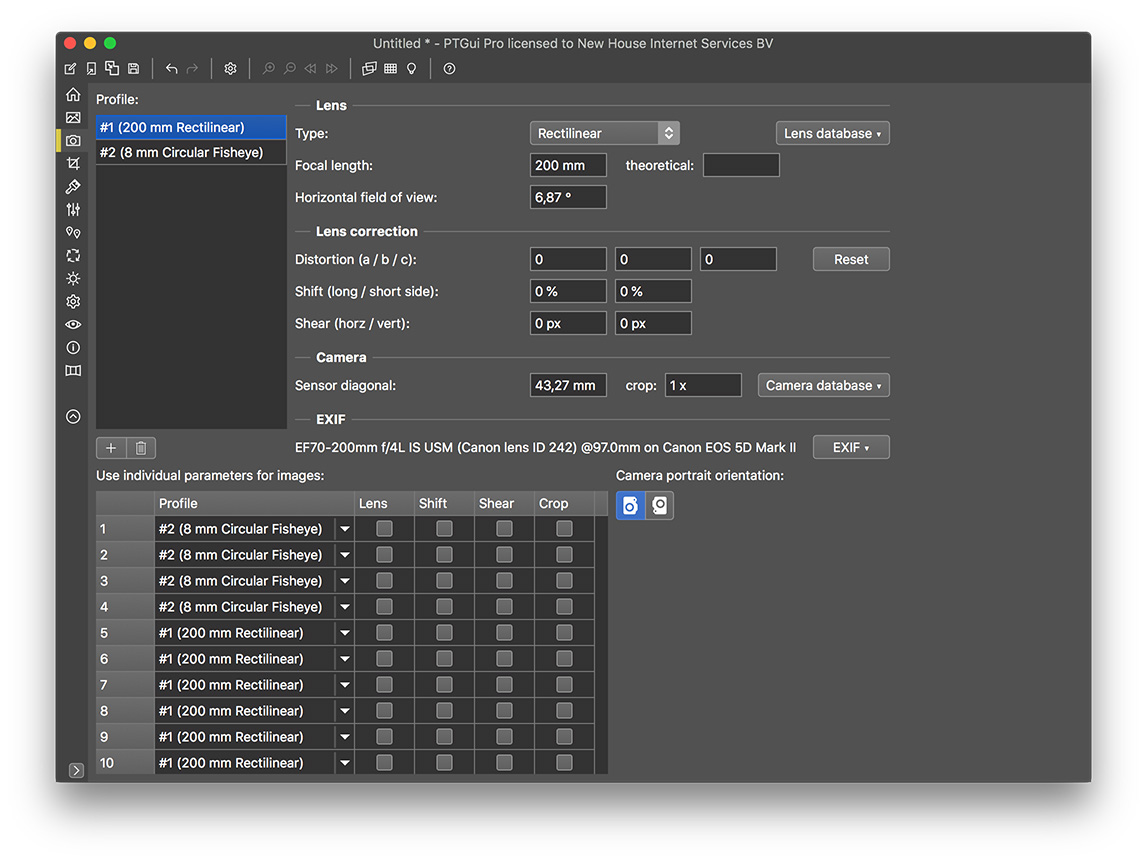
Speaking of lenses, PTGui changes the parametrization of lens data: instead of characterizing a (rectilinear or fisheye) lens by its horizontal field of view, PTGui 11 stores the focal length. Lens shift (i.e. the offset of a lens' optical axis) is now stored as relative offsets on the short and long image dimensions, instead of absolute x/y pixel offsets. These two changes finally make it possible to mix portrait and landscape images in the same project.
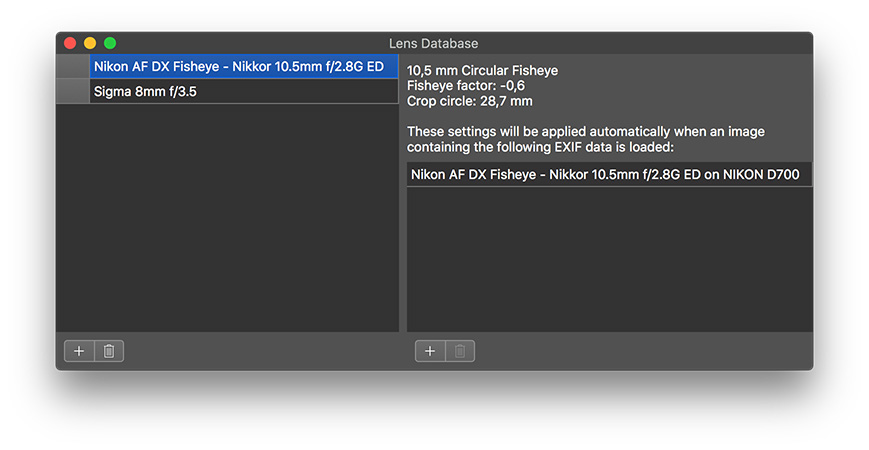
For fisheye lenses PTGui 11 introduces a new fisheye projection parameter allowing it to perfectly model all practical fisheye projections (equidistant, stereographic, orthographic and equisolid). Presets for many known fisheye lenses are included, and selected automatically when a known fisheye lens is recognized in the EXIF data. By knowing the exact fisheye projection PTGui is able to find more control points, particularly in the edges of fisheye images. Furthermore it allows PTGui to set the cropping circle (for circular fisheye lenses) more accurately.
Lens Database
The lens database has been redesigned and now includes the circular fisheye cropping parameters as well. Due to the new lens parametrization the same entry can be used for both portrait and landscape images. Lens database entries can associated with EXIF data, resulting in the lens data to be set automatically when loading an image from a specific camera/lens combination. Similarly there's now a camera sensor size database for automatically setting the sensor size / crop factor based on the EXIF data.
Lens profiles
PTGui now supports multiple cameras and lenses in the same project, using so called lens profiles. For example a gigapixel panorama might be taken with a long 300mm lens but such level of detail is not necessary for the sky. The sky images can now be photographed with a wider angle lens and stitched in the same project by adding a second lens profile to the project. The control point generator will find control points between images from different lenses. Exposure and vignetting optimization will use separate curves for each lens.
Viewpoint optimization
Viewpoint optimization for an image can be enabled right from the Project Assistant, by right-clicking on the thumbnail. If viewpoint correction is enabled for an image, the control point generator will notice and it will find more control points than before, even if the image was taken from a significant viewpoint offset.Control point generator
The control point finder has been rewritten from scratch. Some of the improvements have been mentioned above already: it can now find control points between images taken with different lenses, equirectangular source images are now supported and it will find more control points for images taken from different viewpoints. The new control point generator is also faster and it is better able to find control points for HDR source images. Furthermore it doesn't get confused anymore by symmetrical rooms (PTGui 10 would sometimes place control points between opposite walls, resulting in a mess).Very useful for stitching large panoramas is the option to generate control points only for overlapping images (Pro version only). This gives a significant speed improvement when aligning thousands of images (what would take days may now finish in an hour) and further reduces the chances of faulty control points. The images should be roughly positioned beforehand, using Align to Grid, by applying a template or by loading a PapyWizard XML file.
Batch Builder
The Batch Builder (in PTGui Pro) has a new layout and it runs faster. A new configuration 'Multiple cameras, one subfolder per camera' was added: this is intended for creating time lapse panoramas using multi camera rigs.Support for single shot 360 degree cameras
PTGui now supports dual fisheye images from the Samsung Gear 360, Xiaomi Mijia Sphere and YI 360 cameras. These cameras produce a single image containing two circular images side by side. When loading such an image, PTGui will automatically add two source images for each of the circular fisheye lenses, and position them at opposite sides of the spherical panorama.Cube faces to equirectangular conversion
A long standing request was the option to assemble cube faces into a panorama. This is finally possible in PTGui 11 and it can't be easier: just load the 6 cube faces (as generate by Convert to Cube Faces) into a new project and press Create Panorama. PTGui will figure out (by looking at the file names) which cube face is at which side and switch to 360 x 180 degree equirectangular projection.Help system
The documentation has been rewritten and help information is much more accesible. Most of the documentation has been moved to the tooltips that are displayed when holding the mouse pointer above a parameter.And much more..
The total list comprises 76 changes and new features! For details see the version history. You can download PTGui 11 here, or use Help - Check for Updates from your current version.You can upgrade from an earlier version to PTGui 11 by paying an upgrade fee, or free of charge, depending on the original purchase date. A free trial version is available; you can use it next to your current version by installing to a different folder.
If you have any questions about PTGui 11 please post to the PTGui Support Forum. We'll be happy to help!